Welcome!

Award-winning Chef Phyllis Segura has cooked for people in all walks of life both in the U.S. and E.U. Chef Phyllis has been cooking for special people since 2000.
She attended the Apicius Cooking School of Lorenzo de’Medici in Florence, Italy; received a James Beard Foundation scholarship; attended various New York cooking schools; and watched her grandmother very carefully.
As a personal and private chef Phyllis cooks for individual clients and offers cooking demonstrations regularly. She specializes in small elegant dinner parties, and intimate dinners - plated or buffet, weekday meals and private and group culinary instructions.
The chef prepares a wide variety of cuisines. Whereas a restaurant chef might have a specialty that is served daily, as a personal or private chef Segura applies her skills to the requirements and palates of her clients. Fresh and seasonal ingredients make the best dishes. She is not shy with herbs and spices and will go out of her way to source ingredients.

Vegetarian, Vegan, Macrobiotic, Kosher, grain-free, dairy-free, gluten-free, blood type, diabetic and other special diets are available. Chef prefers to use organic, pesticide and antibiotic free, non-GMO and local products as much as possible.
Consultations with nutritionists are recommended for special needs and diets for proper guidelines.

References and a rate sheet are available. She currently lives in Saugerties, NY.
In 2013 she offered cooking classes in her home kitchen in Spencertown,NY www.reddoorcookingworkshop.blogspot.com

Send an email: info@cookingontheriver.com

To join this site using Google + go to where it says JOIN THIS SITE.
TO GET NOTICES WHEN I POST SOMETHING NEW SUBMIT YOUR EMAIL ADDRESS (no addresses are shared) DIRECTLY BELOW:


FOLLOW WITH GOOGLE +

Saturday, August 17, 2013

The all new: RED DOOR COOKING WORKSHOP AND LIBRARY

THE RED DOOR
COOKING WORKSHOP AND LIBRARY
826 State Route 203 #4, Spencertown, NY 12165

SCHEDULE OF CLASSES 2013

Welcome to The Red Door. Come back to home cooking and eating unprocessed foods. Join Chef Instructor Phyllis Segura:

OCTOBER
Farmer’s Markets are available until the end of October.

TUESDAY, OCTOBER 8 – 6 to 8PM SAVING SUMMER’S BOUNTY-1   Brandied Fruits, Eggplant and Butternut Squash Caponata, Preserved Lemons.  Saving tomatoes. Putting sunshine in a jar.

SUNDAY, OCTOBER 13 - 3 to 5 PM  ALL-VEGETABLES  Cannellini Beans with garlic and sage; Yellow Lentils and Chickpeas with onion, mustard, turmeric and lemon juice; Green Beans with tahini, lemon juice, garlic, parsley; Grilled Eggplant with sumac, mint, parsley, olive oil.

TUESDAY, OCTOBER 22 - 6 to 8 PM  SAVING SUMMER’S BOUNTY-2   Techniques of pickling and fermenting: cucumbers, beets, cabbage. Dehydrating and Freezing.  Compound butters.

SUNDAY, OCTOBER 27 –3 to 5 PM  CHICKEN AND DUCK  Lyon-style Chicken and Vinegar, Duck with Spice Dust and Cherry Sauce

NOVEMBER
Daylight savings time begins on Nov 3rd.  Thanksgiving is Thursday, Nov 28 and Hanukah begins Wednesday, Nov 27.

WEDNESDAY, NOVEMBER 6 –6 to 8 PM  CHINESE TAKE-OUT & STIR-FRYING  We will make dishes you can make at home better than take-out. Kung Pao Chicken, Tomato Beef. Greens

SATURDAY, NOVEMBER 9 –3 to 5 PM   MOROCCAN-INSPIRED & TAGINES   Chicken with Olives and Preserved Lemon, Chermoula Sauce

TUESDAY, NOVEMBER 12 –6 to 8 PM    SAVORY & SWEET CREPES   Crepes are simple to make and can be frozen. We’ll make the classic Crepe Suzettes, as well as Savory Crepes with Artichoke and Spinach, and Sweet Crepes with Banana and Nutella, Strawberry fillings.
SUNDAY, NOVEMBER 17 –3 TO 5:30 PM   THE CONTEMPLATIVE KITCHEN  Applying principles of meditation to the preparation of food. Various steamed Dumplings: Momos.

TUESDAY, NOVEMBER 26 –6 to 8 PM   POTATO, ZUCCHINI OR CARROT PANCAKES  We’ll be frying, tasting and freezing these.

DECEMBER
Dec 21st - First Day of Winter.  New Classes begin in January 2014.

TUESDAY, DECEMBER 3 - 6 to 8:30 PM  CLASSIC APPETIZERS  Bagna Cauda, Blini, Pissaladiere, Fried Mozzarella Balls with Prosciutto

SUNDAY, DECEMBER 8 - 3 to 6 PM A WHOLE MEAL
Butternut Squash and Sage Risotto, Winter Salad with Poppyseed Vinaigrette, Marscarpone Stuffed Poached Pears

TUESDAY, DECEMBER 10 - 6 to 8 PM COOKIES - TBD

SUNDAY, DECEMBER 15 - 3 to 5 PM SOUPS
Classic Ribollita, Black Bean, and Chicken Egg Drop.  A class can be added for creating Basic Stocks.

FRIDAY, DECEMBER 20 - 6 to 8 PM COOKING WITH BEER  Beer and Cream Scalloped Potatoes, Beef Carbonade, Beer and Cheddar Soup

·       All classes are geared to the students level. Classes are limited to 4 people. Once a class is full an additional date can be added if there are 4 people. Advanced classes can be scheduled. Teens welcome.

·       All times are suggestions and can be custom altered. For private groups of four a specific date can be arranged.

·       Class fees for 3-4 are $45, plus a $5 supply fee, per person, unless otherwise indicated. Bring a knife and apron.

·       Private classes are available for 1 or 2 people. Class fee is $70, plus a $5 supply fee, per person.

·       All classes include take home recipes and eating what you made! The library is on the premises.
Be entertained! Cook, laugh and learn together!

REGISTER: 518-392-1947/845-653-1145
email: phylseg@gmail.com

www.cookingontheriver.blogspot.com


826 State Route 203, #4, Spencertown, NY 12165


Saturday, August 03, 2013

BLUEBERRY CUSTARD PIE

It's blueberry season around here. You can even pick your own. I'm going to give it a try but either early in the morning or after the sun peaks. Meanwhile, I purchased a quart or more already picked. Made an experiment with Blueberry Custard pie last night. Decided to make two - double the fun. And needed to try out my new oven to see how even and hot it gets. I'm also trying to work out the choreography in this kitchen; it takes a while to get your moves right.

I'm going to give you the recipe for the pie but only if you ask. Why? Because I'm too lazy right now and I'm waiting for some friends to come by and eat the pie and I've got to make some tea. IF YOU WOULD LIKE THIS RECIPE WRITE SOMETHING IN THE COMMENTS AND I WILL RESPOND.


Without being specific, I made a crust the usual way, flour, butter, bit of water. I bought salted butter in error and it might have helped frankly because the crust is about the flakiest I've ever made.

I used about a quart and more of blueberries. It looked like a lot in the bowl but once I put them into the pie shell it was only one layer, which turned out to be enough.

I sprinkled the blueberries with a bit of flour and arrowroot powder. By a bit I mean about a tablespoon full.

Then I prepared a custard with creme fraiche, sugar (the white stuff), an egg, well 2 eggs since I was making two, and also about a tablespoon of toasted and ground up almonds and hazelnuts, plus a capful of vanilla extract. I make my own vanilla extract with vanilla strips and vodka. It takes about 3 months but after that you just pour in more vodka. Mix well.

Roll out the pie dough really thin. Really. Preheat the oven to 400 degrees F. Place the bottom of the pie in the oven, having pricked it with a fork in several places, and bake for about 8 minutes. Take out and put on a rack to cool for about 10 minutes.

Roll out some of the dough meanwhile and cut into strips.

Then put the blueberries in, spread them around, pour the custard over. Cross-hatch the strips over the top of the pie. I also put some around the edge...you'll see in the photo. I baked it over 30 minutes...until golden as it appears. The blueberries and the custard mingled together to form a whole.

The thing that is interesting, and surprising to me, about this pie is that the bottom crust is crispy. It might be because of being so thin. I tasted it after it cooled and then again in the morning thinking it would be soggy, but it was still crispy. So no more guey cornstarchy gloppy pie!

Here are the photos:


Here is the recipe:
Blueberry Custard Pie

Pre-heat oven to 400° F.

Pie Crust
1-1/2 cups flour
1-1/2 sticks salted butter, cold and cut into pieces
3-6 tablespoons ice cold water

Place the flour in a food processor and buzz a couple of times. Add the butter and buzz until just flaky. Add the ice water a tablespoon at a time. If the flour is dry you will need
all 6 tablespoons. Take out on to a floured board. The dough should be slightly most and
pliable. Knead together and mound into a disc about 6 inches by 1-1/2 inches high. Wrap in plastic or waxed paper and put into the freezer for about 10 minutes or the refrigerator up to overnight.

Roll out the rest of the dough and cut strips with a zig-zag cutter or a knife.

The Filling

2 cups fresh blueberries
1 tablespoon flour
1 tablespoon arrowroot powder

Wash the blueberries and put into a bowl. Toss with the flour and arrowroot.

The Custard

1/3 cup crème fraiche
¼ cup sugar
1 egg
1 tablespoon hazelnuts
1 tablespoon almonds
½ teaspoon vanilla extract, optional
Heavy Cream or 1 egg mixed with 1 tablespoon water

Toast the nuts. You can use a cast-iron pan. Put them into a coffee grinder reserved for everything but coffee. Or if you have ground nuts, use them. Grind to a powder or paste.
Mix all the ingredients together with a whisk.

Take the pie dough out of the freezer and place on a flour sprinkled surface. Divide in half. Roll out to a very thin circle large enough for your pie pan. Place into the pie pan by rolling it up on the rolling pin and then unrolling it into the pan. Press down the sides and prick the bottom with a fork in several places. Place into the preheated oven on a sheet pan and back about 8-10 minutes. Take out and let cool on a rack for about 10 minutes.

Put the blueberries into the pre-baked shell. Pour the custard over. Place the dough strips across the top in a lattice and place some strips around the circumference of the pie, pressing down so that they stick. Brush some cream or an egg mixed with water over the dough.

Place in the middle of the oven on a sheet pan. Bake about 40 minutes or until the dough is golden and the custard and berries have set.


Monday, July 29, 2013

NEW BEGINNING

This is the first time I am writing from my new location in Spencertown, NY where I moved to from Piermont, NY this month, July 2013.

The moving has kept me busy, first with packing and now with unpacking and arranging. I'm still waiting for some bookcases so I can take the cookbooks out of the boxes. I hope that will happen soon. Maybe even today.

I'm gearing up to be able to teach cooking classes in my kitchen. Photos of the kitchen will follow.

There are a multitude of farms here and it is most glorious. When you say you want to eat locally you have to have farms and people who make products. I logged on to localharvest.org and found over 132 places within a 25 mile radius.

The local peaches are here. My first interest is in preparing foods to store over the winter. I like to freeze things over the other choice of canning. A vacuum sealer is very helpful for freezing.

I will be making some Brandied Peaches this week and will post the process and recipe. Simply cutting up, or leaving whole, you can freeze fruits and then package them. Usually we are told they are good up to 3 months but they do last longer.

Next will be an Eggplant Caponata.

Tuesday, April 09, 2013

WHAT I'M COOKING TOMORROW

Since I haven't been showing you what I am cooking lately...I am listing what I'm cooking for a client tomorrow. You can also see how they are packaged. Photos below:


Chicken Breast stuffed with Prosciutto and Herb Garlic Cheese

with a Lemon Sauce

Quinoa Pilaf with Shiitakes, Carrots, and Pecans


Soy-roasted Salmon


Asparagus and Beets with Goat Cheese


In the refrigerator


Beef and Sauce Stuffed Eggplant with Bechamel Sauce


Sauteed Broccoli and Tomatoes


and a Mixed Green Salad with Green Goddess Dressing 
(no photos)


Sunday, March 31, 2013

MATZO BREI TUTORIAL

 I still have a few friends who do not know how to make their own Matzo Brei, even if they are Jewish. So to help them out I've created this simple 16-step (four beyond 12-steps) tutorial to make this simple dish. Personally, I never make it except during Passover but there is no reason not to make it at any other time.

What you need is some fat - butter, chicken fat, olive oil...even the current predilection for coconut oil would be fine...whatever you like; 2 eggs, 2 pieces of plain matzo, (I suppose you could make this with the flavored onion or poppy matzos too, but I've noticed that they aren't de rigeur for Passover, whatever, let's stick with the simple) salt, water. When it comes to condiments you will have to determine whether you want a sweet or savory Matzo Brei. Suggestions follow.

Don't be fooled here that because the first letter of Matzo Brei is the same as Mario Batali; there is no connection. And, no Franne, it's not a Matzo Bra.

So, if you like your ingredient list vertical, here it is:


2 pieces plain matzo
water
2 eggs
salt
1 tablespoon fat : butter

The instructions are given here step-by-step under each picture:


You need a bowl, 2 eggs, 2 pieces of matzo, butter.

Break up the matzo into small pieces and put into the bowl.

Add water and soak the matzo briefly to soften slightly. 
You can also use milk if you like.


Squeeze out the liquid.

Add the 2 eggs.


Mix the eggs and the matzo together.
 
 Add some salt.

Warm a small non-stick frying pan (I use Circulon) and add  the butter.
Let the butter melt. I went a little too far for some...I prefer brown butter.
Add the matzo egg mixture.
Cook over a low flame.
When it looks like this on one side, turn it over.
Be brave and use a flipping motion, or a spatula if you must.
When it's browned on both sides and cooked in the middle turn it on to a plate.
Don't worry, you'll know when it's done. Don't raise the flame.
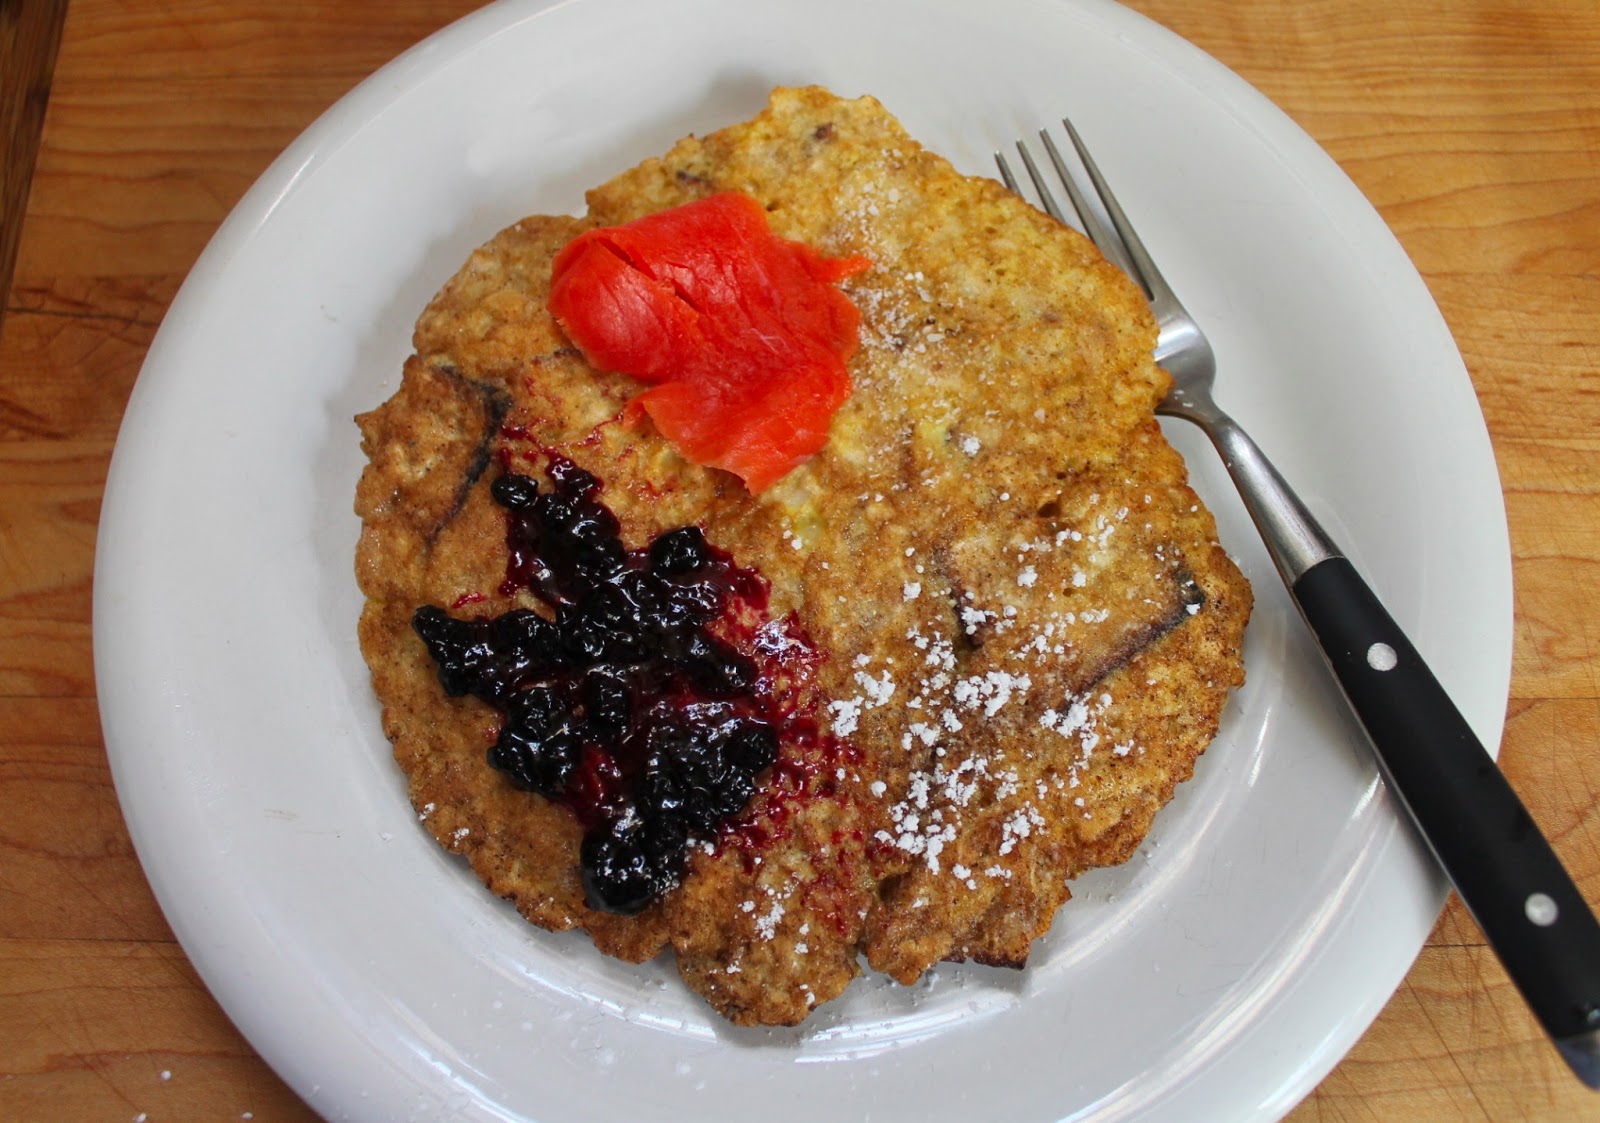
Here are some options for toppings: honey, salt, jam, powdered sugar, cinnamon, lox...
I recommend you choose just one.
 
Here it is with a sampling of each.
I chose the blueberry jam.
That's it: Matzo Brei. Pour yourself a cup of coffee. Enjoy!

Friday, March 29, 2013

Long Hiatus

It's been a long hiatus since I last posted something here. Stay tuned for a "Matzo Brei" tutorial coming up very soon....and more.

There is also this event:


Wednesday, September 12, 2012

THE GRAND AIOLI

 THE VERY GRANDISSIMO AIOLI

THE AIOLI IS ON THE UPPER RIGHT

All summer, or so it seems, I have been thinking about making a "grand aioli" and finally got to do it last night as the long, hot summer has been winding down. I have been surprised by the amount of people who do not know what this is. It is a large array of freshly steamed or lightly boiled vegetables, some beans, of the season, with additions of white fish, like cod, and sometimes mussels and/or small octopus. All these things act simply as a delivery system for AIOLI, which is a garlicky mayonnaise, preferably made fresh.

I gathered my vegetable ingredients: fingerling potatoes from the farmer's market, green beans (not haricot vert, tho you could,  but whopping big fingers of green), large carrots (not baby carrots or newly pulled thin ones and certainly not those things called baby carrots you can buy in packages), a hefty cauliflower, a fennel bulb with fronds, small zucchini (the only kind I like because of fewer seeds).

Then I made some dried chickpeas in the pressure cooker that only took about 40 minutes. And they are oh-so-much-better than the canned variety. Though the canned ones, once rinsed and drained, are fine and I use them all the time, still when you do make some fresh you can taste the difference. I drained them and added extra-virgin olive oil, pimenton, salt, and lots of freshly ground black pepper. I also chopped up some of the fennel fronds and tossed them in. Stir well. Pile on.

 I purchased some fresh cod.

First I made the Aioli. Alas, I must admit that I used the food processor. Though I have many mortar and pestle sets there was just not one large enough to do this task. I keep promising myself to make a trip to NYC Chinatown to purchase one of those large Thai sets...


THE AIOLI
3-6 large cloves of organic garlic, minced (not the stuff imported from China, okay?)
3 egg yolks
juice of 1 lemon
1 cup extra-virgin olive oil
1/2 cup grapeseed oil
Salt

With the processor running, drop the minced garlic in through the feeding tube. Add the 3 yolks, quickly followed by the lemon juice. Keep the processor running and slowly, slowly drizzle in the oil until it is all used. You should have a thick emulsion with a beautiful yellow and slightly green color. Stir in some salt. If you think it's too thick turn the processor on again and drizzle in about 1 tablespoon of water. Check it. Taste it. See if it needs more lemon juice or water or salt. Take out and put into a non-reactive container, like glass or ceramic. Cover and refrigerate.


When you are ready to cook the vegetables. Put the potatoes into a large pot and add a little salt and enough water to cover the potatoes. Bring to a boil, then simmer about 10 minutes, or until the potatoes are fork tender. (Since all that is required is to boil all the vegetables to the perfect doneness your task and attention is well-defined.) Remove the potatoes to a platter when done.  (I like to slice them in half to serve.) Next, add the carrots, I have cut these fat ones on a very diagonal slant. Cook about 3-5 minutes. Done. Take out with a perforated spoon. Put on platter. Then the green beans, after they have been tipped and tailed. Cook until perfectly crisp and not toothy. Then the zucchini, cut in wide sections, for about 2 minutes - just a quick bath. The fennel that has been quartered will only take another 2 minutes. The cauliflower that has been cut into flowerettes to be submerged and cooked for 2-3 minutes. Don't make it too soft. Attention must be paid. What else, did I forget something? The choice of vegetables is really up to you. Maybe a sliced sweet potato would be nice...or save that for the autumn grand aioli...

The cod needs to be salted the day before. Rinse and dry. Then salt on both sides. Place in a bag and leave for 24 hours. When ready to cook it, rinse again and dry. To poach you can either use all white wine, or, as I did, about 1 cup of white wine and the rest water. Use a wide pan and cut the cod to fit. Bring to a boil, then lower the heat so that you don't see any more bubbles and slide the cod in to cook. The poaching liquid should cover the fish. Cook about 5 minutes.

THE PLATE

Everything should be warm, room temperature, not hot. If you have one large platter it's nice to arrange everything on it. I don't have one so I used an assortment of deep vessels. It's colorful and very lavish. Have a good white wine and maybe a warm crusty bread.  Everything should be clean and well-arranged. For color you can toss on some smiggens of chopped parsley and black olives.

Sit yourself down and gawk at the beauty presented before you. Enjoy this well because you have now figured out how to eat lots of vegetables and love every bite. It's soooo healthy. But please don't smear any of that Aioli on your face though you might well be tempted; it's so good.

Bon Bon Appetit!
Le plat du jour.


Share